Barcode Studio User Interface
Overview
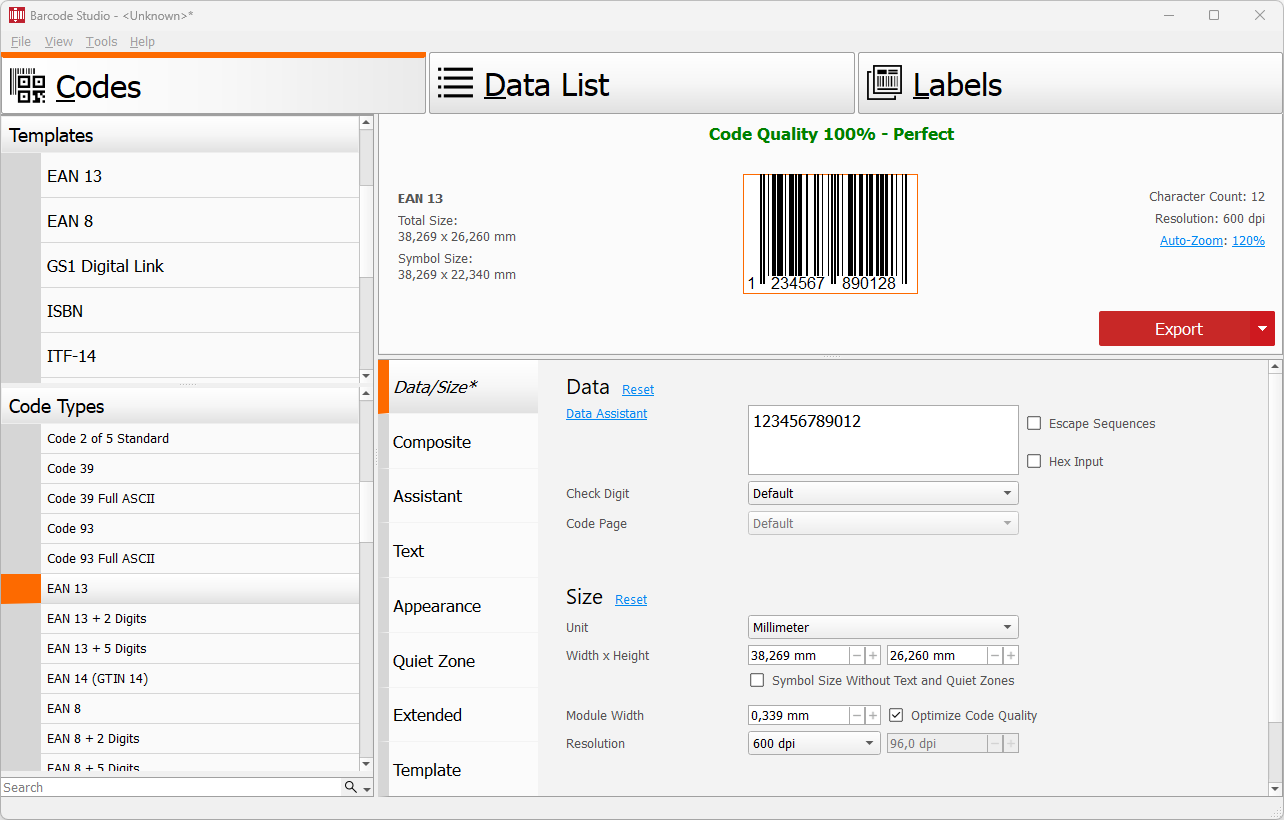
| Area | Location | Purpose |
|---|---|---|
| Menu | Top | Access Barcode Studio commands and program settings. |
| Codes, Data List, and Labels | Across the top | Switch between creating codes, working with a data list, and printing labels. |
| Templates and Code Types | Left | Select a code type or apply predefined settings. |
| Code View | Upper right | Preview the current barcode and export, copy, or print it. |
| Status Information | Around the preview | Check code quality, size, resolution, and zoom. |
| Settings | Lower right | Enter data and adjust the code's size, text, appearance, and other properties. |
Menu
File
New- Create a new document with default code settings. Ctrl+N
Open...- Open an existing settings file (
*.bc). Ctrl+O Save Settings- Save the current settings (symbology, dimensions, module width, etc.) to a
.bcfile. Ctrl+S Save Settings As...- Save current settings to a new file.
Save As Template...- Save current settings as a template in the Templates folder.
Print Code...- Print the code and the most important settings (size, resolution, etc.).
Exit- Exit Barcode Studio. Alt+F4
View
Zoom In / Zoom Out- Increase or decrease the preview zoom. Ctrl+ / Ctrl+-
Reset Zoom- Display the code at its original size.
Zoom Dialog- Open the zoom value dialog.
Tools
Options...- Open the Options dialog box. See Options.
GS1 Definitions...- Update the GS1 dictionary and Application Identifiers. See GS1 Definitions.
Refresh Templates- Reload the templates folder. Ctrl+R
Help
Help- Open this documentation. F1
Command Line Usage- Open a dialog with instructions on command-line parameters.
Check For Update...- Check for Barcode Studio updates.
Buy Barcode Studio...- Open the TEC-IT order form in the web browser.
License...- Open the license and activation dialog. See Licensing.
Activation Key Management...- Open the TEC-IT license portal to find, reactivate, or reset an Activation Key, for example after reinstalling Barcode Studio or moving it to another computer.
About Barcode Studio- Version number and copyright information.
Online resources (all open in the browser):
Visit tec-it.com, Barcode Reference, Google Reviews, YouTube Videos, X (Twitter).
Dark and Light Mode
Barcode Studio adapts to the operating system's light/dark mode setting. Switching modes while the application is running is not supported.
Code View
The Code View shows a preview of the current barcode. Information around the preview shows its quality, size, resolution, and zoom.
Use the Export button in the preview area to export, copy, or print single codes. See Generate Codes – Export and Print.
Templates and Code Types
Code Type
Select the desired code type (= symbology) from the list. The list is grouped by category: Linear Barcodes, 2D Codes, Postal Codes, GS1 Codes, and Health Care Codes.
To learn more about the supported symbologies, open the Barcode Reference (Help > Online Resources > Barcode Reference).
Template
Select a template from the Templates list to apply its preconfigured settings (symbology, dimensions, module width, etc.). Any previously adjusted settings will be overwritten by the template settings.
Manage templates:
- Save a new template: File > Save As Template... or click Save Template in the Codes > Template view.
- Reload the template list: Tools > Refresh Templates.
- Edit template metadata (title, category, keywords): use the Page Template settings tab.
Filter
To easily find the desired code type or template, enter a filter text in the search box below the list. Click the Search button to switch between filter modes:
Search the List – shows only code types and templates whose name contains or is related to the filter text.
Search by Allowed Content – limits the Code Type list to the symbologies that can encode the filter data. This is useful when you know the data but are not sure which symbology to use.
Code Status
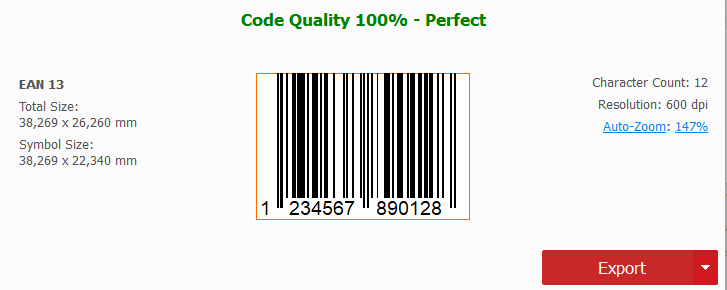
The information around the preview shows the current code quality and code attributes. Some information, such as the template name or application, appears only when applicable:
| Field | Description |
|---|---|
| Quality | Indicates how precisely the modules align with the pixel grid at the selected output resolution. Higher values generally provide better conditions for reliable scanning. |
| Template | Name of the applied template, if any. |
| Total Size | Overall code size, including human-readable text and quiet zones. |
| Symbol Size | Barcode symbol size, excluding human-readable text and quiet zones. |
| Code Type | Name of the selected barcode type (symbology). |
| Application | Application selected in the Data Assistant, if any. |
| Character Count | Number of characters in the current code data. |
| Resolution | Selected output resolution in dpi. |
| Zoom / Auto-Zoom | Current preview magnification. Use Auto-Zoom to fit the barcode to the available preview area, or click the value to open the Zoom dialog. |
Quality depends on the output resolution and the module width. To achieve Perfect quality, enable Optimize Code Quality or select Pixel as the unit and enter a whole-number module width.
Settings Pages
Use the tab bar to switch between the following settings pages:
Depending on the selected code type, additional settings pages become available:
- Code-specific settings – contain settings that apply only to the selected code type. The tab is named for the available settings, for example QR-Code or Data Matrix. See Special Options.
- Assistant – helps you create structured barcode data, such as GS1 data with Application Identifiers or vCard contact data. It provides suitable input fields and prepares the data to be encoded. See Data Assistant.
When settings in a section differ from their defaults, a Reset link appears beside the section heading. Select Reset to restore all settings in that section. Settings in other sections are not affected.
Page Data/Size
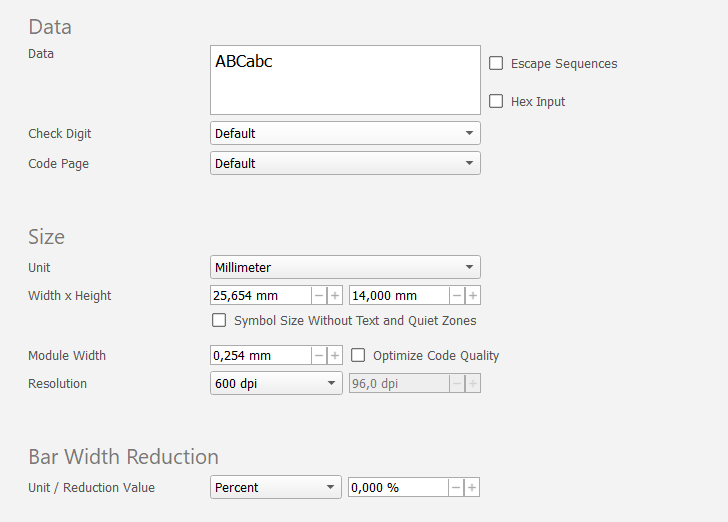
Data
The Data field contains the barcode content. Barcode Studio provides default data for each code type. Each symbology can encode a specific set of characters: some accept digits only, others accept alphanumeric characters, and still others support the full ASCII character set. Use Search by Allowed Content to find symbologies compatible with your data.
Control Characters
Some barcode formats or applications require control or function characters,
such as FNC1, carriage return, line feed, or tab. When you need one, right-click
the Data field, select Add Control Characters, and choose the required
character. The menu inserts the corresponding escape sequence, for example \F
for FNC1, \r for carriage return, \n for line feed, or \t for tab.
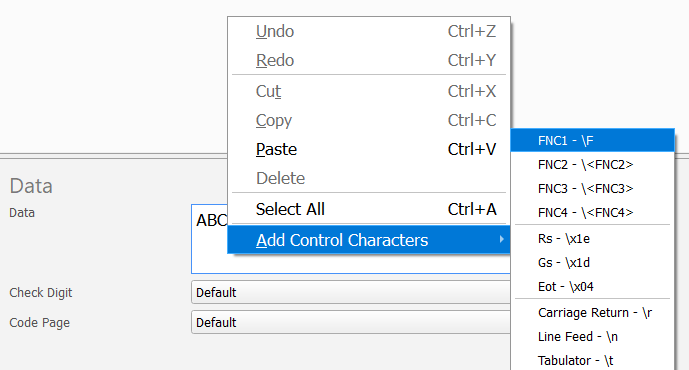
Barcode Studio automatically enables Escape Sequences when you insert a control character from the menu.
Escape Sequences
Enable escape sequences when the data contains sequences for control or function characters such as FNC1, carriage return, or line feed.
- Disabled (default): the backslash (
\) is treated as a literal character. - Enabled: recognized sequences such as
\F,\r, and\nare processed before encoding. Enter a literal backslash as\\.
For the complete list of recognized escape sequences, open the Barcode Reference through Help > Online Resources > Barcode Reference.
Hex Input
When Hex Input is enabled, data entered manually or imported into the Data List
is interpreted as pairs of hexadecimal digits. Each pair represents one byte;
for example, 414243 represents ABC. The setting applies to both the Data
and Composite fields.
Check Digit
Use Check Digit to select the method used to calculate one or more check digits. A scanner can use the check digits to detect incorrectly read data. The available methods depend on the selected code type.
- Default uses the method defined by the selected symbology's specification. Keep this setting for code types with a fixed check digit method.
- If the code type supports different methods, select the method required by your application.
For symbologies with a fixed check-digit position (EAN, UPC, Postnet, GS1 DataBar), Barcode Studio can calculate and append the check digit. You can also enter the complete value including the check digit, but the supplied value must match the calculated one. Select None only when your application explicitly requires check digit validation to be disabled.
Refer to the Barcode Reference through Help > Online Resources > Barcode Reference for details on check digit algorithms.
Code Page
Code Page determines how entered characters are represented when the barcode data is encoded and Encoding Mode is set to Selected Code Page. In most cases, keep Default. For a detailed explanation of encoding modes and code pages, see Encoding.
Size
Unit and Dimensions
Use Unit to select the measurement for Width, Height, and Module Width. Available units are millimeters, inches, mils, pixels, points, and micrometers. When Pixel is selected, the physical output size depends on the selected resolution.
Width and Height show the complete code size, including human-readable text and quiet zones. Select Symbol Size Without Text and Quiet Zones to view and edit only the barcode symbol.
Module Width
Barcodes are composed of modules – the smallest segments representing individual bars or spaces. The module width is the width of this narrowest element, and it is the fundamental unit on which all other barcode widths are based. Adjusting the module width directly changes the overall code width, and vice versa.
At the selected resolution, the module width must be at least one pixel. For linear barcodes with variable bar widths, use a module width of at least 0.19 mm unless your application specification requires another value. Smaller values can make the code difficult or impossible to scan.
Optimize Code Quality
When enabled, Barcode Studio rounds the module width down to the nearest integer pixel size. This avoids uneven bar widths in raster output and generally provides better conditions for reliable scanning.
Enable Optimize Code Quality whenever you are exporting to raster formats at low or medium resolutions. The quality indicator will read 100% (Perfect).
The preview represents the pixel grid accurately only at Screen Resolution. For higher output resolutions, assess the exported file or printed result rather than the on-screen preview.
Resolution
Select the output resolution used to calculate raster output. A higher resolution creates more pixels for the same physical code size.
| Value | Recommended use |
|---|---|
| Screen Resolution | Output for screens and web applications |
| Printer Resolution | Output for the currently selected printer |
| Fixed dpi value | Output for a target device with a known resolution |
| Custom Resolution... | Enter an exact dpi value that is not available as a preset |
Keep the resolution consistent with the target device or application. Some applications use the pixel dimensions instead of the stored physical size when displaying raster images. A high-resolution export may therefore appear larger on screen.
Not all image formats store resolution information. See Appendix C: Image Types for format-specific details.
Bar Width Reduction
Reduces bars or dots by a fixed value or a percentage of the module width. Use this setting to compensate for ink spreading on inkjet printers or high toner saturation on laser printers.
Available units are percent of the module width, millimeters, inches, or mils. For example, a value of 20 percent reduces bars or dots by 20% of the module width.
Setting bar width reduction above 50% of the module width may render codes unreadable. Always perform multiple test scans after adjusting this setting. A common starting value is 15%.
To set different horizontal and vertical reductions, enter the following string under Extended / Code Options:
DRAW_BarWidthReduction_Values={x=[double] y=[double] unit=[enum]}
Here, unit is 1 for pixel, 2 for millimeter, 3 for mils, or 4 for
inch.
Page Text
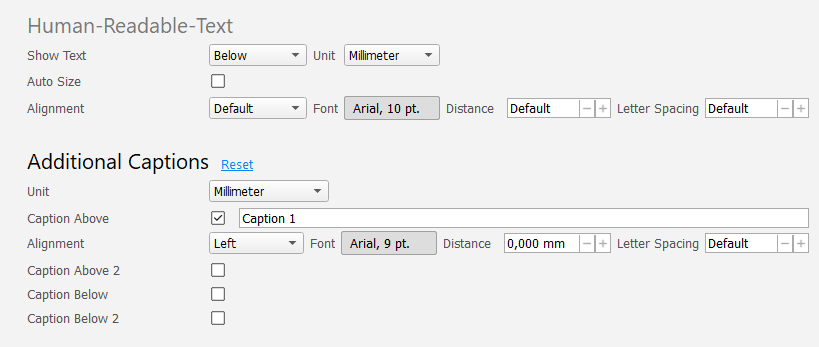
Human-Readable Text
| Setting | Description |
|---|---|
| Show Text | Hide the human-readable text with No Text, or display it Below (default) or Above the barcode. The available choices depend on the selected code type. |
| Unit | Select the measurement used for Distance and Letter Spacing. Available units are modules, millimeters, inches, mils, pixels, points, and micrometers. |
| Auto Size | Automatically adjust the font size to fit the barcode width. Custom Distance and Letter Spacing values scale with the font size. |
| Alignment | Set the horizontal position of the text to Default, Left, Right, or Center. |
| Font | Select the typeface, style, and size used for the text. |
| Distance | Set the distance between the human-readable text and the barcode. For an additional caption, this can also be the distance to the next caption closer to the barcode. |
| Letter Spacing | Add space between individual characters in the selected unit. |
Additional Captions
You can add up to two captions above and two below the barcode. Select the box for the required caption and enter its text. Alignment, font, distance, and letter spacing can be set independently for each caption.
Page Appearance
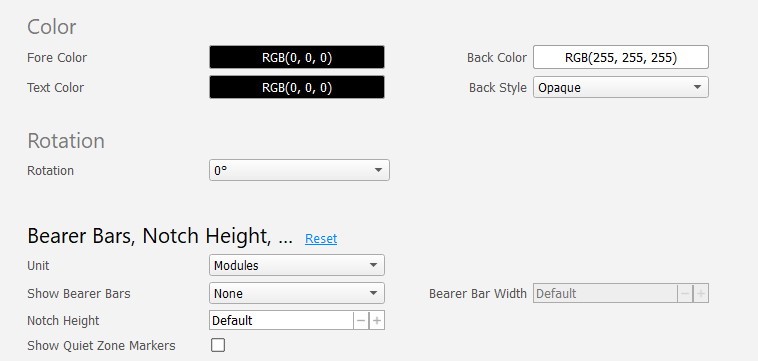
Color
Click the color button next to the target property to open the color picker:
- Fore Color
- Color of the bars and dots.
- Back Color
- Color of the barcode background, including the spaces between bars.
- Text Color
- Color of the human-readable text.
- Back Style
- Opaque (default) draws the selected back color. Transparent lets the underlying background show through.
For professional print workflows, use CMYK or a named spot color (spot colors are available for PDF export only).
Rotation
Select a rotation of 0°, 90°, 180°, or 270°.
Bearer Bars and Notch Height
Bearer Bars – optional lines around a linear barcode that help scanners recognize the complete symbol and reduce the risk of partial scans. Available styles are None, Top and Bottom, Rectangle, Top, and Bottom. Use Unit and Bearer Bar Width to set their thickness.
Notch Height – controls how far the synchronization bars at the left, center, and right of supported EAN and UPC codes extend beyond the regular bar height.
Show Quiet Zone Markers – shows or hides markers at the outer edges of supported EAN and UPC codes.
Embedded Logo
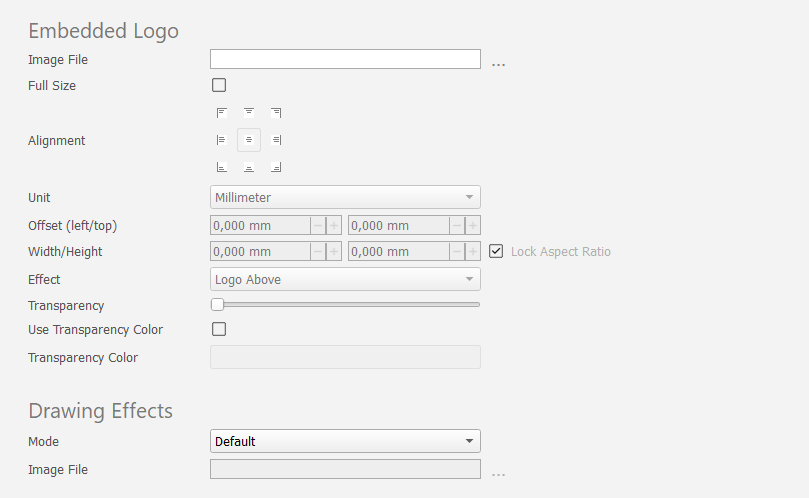
Embedding a logo changes the barcode symbol and can reduce readability. Test the finished barcode with the intended scanner at its actual output size and on the intended medium.
| Setting | Description |
|---|---|
| Image File | Path to the logo image file. Further settings are only accessible once a valid file is selected. |
| Full Size | Stretch the logo to the full size of the barcode. Select an appropriate Effect for the required result. |
| Alignment | Position of the logo within the code. |
| Unit | Measurement used for the logo position and size. |
| Offset (left/top) | Horizontal and vertical distance from the selected alignment position. |
| Width/Height | Width and height of the logo in the selected unit. |
| Lock Aspect Ratio | Keep the relationship between width and height when resizing the logo. |
| Effect | Control how the logo and barcode are combined, for example Logo Above, Logo Below, or Mask. |
| Transparency | Adjust the logo from opaque to invisible. |
| Use Transparency Color | Make all areas with the selected transparency color transparent. |
| Transparency Color | Select the color to be treated as transparent. |
Drawing Effects
Drawing effects change the shape of bars or dots and can reduce readability. For normal use, keep Mode set to Default. Test barcodes created with any other mode using the intended scanner and output medium.
| Mode | Description |
|---|---|
| Default | Draw bars and dots in their standard form. Recommended for normal use. |
| Rectangles | Draw barcode elements as rectangles. |
| Circles/Ellipses | Draw barcode elements as circles or ellipses. |
| Big Circles/Ellipses | Draw larger circles or ellipses that can overlap in matrix codes. |
| Rounded Rectangles | Draw barcode elements as rectangles with rounded corners. |
| Images | Draw an image in place of each barcode element. |
For Images, select the image file in the adjacent field.
Page Quiet Zone
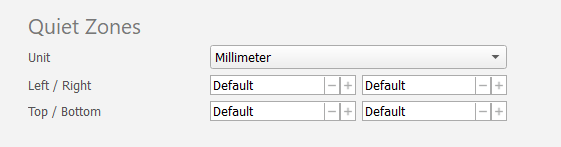
The quiet zone is the clear area around the barcode. Use Unit to select modules, millimeters, inches, mils, pixels, points, or micrometers, and set the left, right, top, and bottom values independently.
Keep Default unless the specification for your application requires a particular quiet zone size.
Page Extended
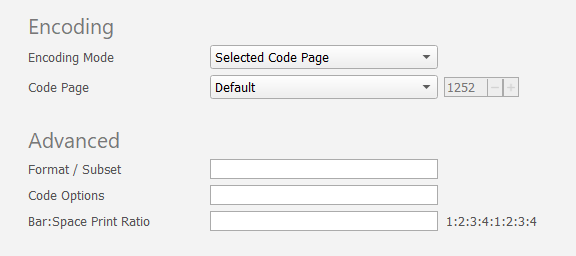
Encoding
Encoding Mode
Encoding Mode determines how Barcode Studio represents entered characters as bytes in the barcode. Keep Selected Code Page for normal text. Use one of the byte-order modes only when the receiving application or barcode specification requires that exact representation.
| Mode | Behavior |
|---|---|
| Selected Code Page (default) | Convert the input using the character set selected under Code Page. This is the recommended mode for normal text. |
| Lo-Bytes only | Encode only the lower byte of each input character and discard the higher byte. |
| Lo- before Hi-Byte | Encode both bytes without code-page conversion, with the lower byte first. |
| Hi- before Lo-Byte | Encode both bytes without code-page conversion, with the higher byte first. |
Refer to the Barcode Reference (Help > Online Resources > Barcode Reference) for details.
Code Page
When Encoding Mode is set to Selected Code Page, Code Page selects the character set used for the conversion. Choose a predefined code page such as ANSI, ISO 8859-1 Latin I, UTF-8, or Shift-JIS. To use another code page, select Custom Encoding... and enter its numeric ID.
Advanced
Format / Subset
Use Format / Subset to apply a barcode-specific data format or select a supported subset. A format string can restructure the entered data or insert fixed characters. Change this setting only when required by the selected code type or application.
See the Barcode Reference under Help > Online Resources > Barcode Reference for the supported syntax.
Code Options
Use Code Options for advanced barcode-specific settings that are not exposed as separate controls. Enter an option string only when the Barcode Reference or TEC-IT Support provides the required syntax.
Bar:Space Print Ratio
The print ratio defines the widths of bars and spaces as multiples of the
module width. Enter the values as a colon-separated sequence, starting with
the bar widths from narrowest to widest and followed by the space widths. For
example, 1 represents one module width and 2 represents two module widths.
Use the Default Print Ratio shown beside the field as a template. It provides the correct number of bar and space values for the selected code type. Clear the field to restore the default ratio.
Example for Code 128 with 4 distinct bar widths and 4 distinct space widths:
1:2:3:4:1:2:3:4
- The first four values (
1:2:3:4) are bar widths. - The last four values (
1:2:3:4) are space widths.
Modifying the print ratio is an advanced operation. Incorrect values can render codes unreadable. Always perform test scans after any changes.
See also the Barcode Reference (Help > Online Resources > Barcode Reference).
Page Template
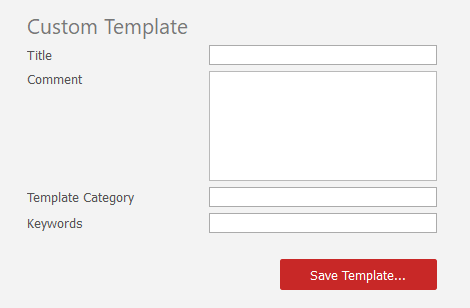
Save the current code configuration as a reusable template:
- Enter a Title and, if useful, a Comment.
- Set the Template Category to group the template in the Templates tree.
- Add Keywords to make the template easier to find with the filter.
- Click Save Template... or use File > Save As Template....
The saved template is then available in the Templates list.
See also Template.
Special Options
Barcode Studio provides additional settings for selected code types. The available settings page and fields depend on the selected code type.
Aztec Code
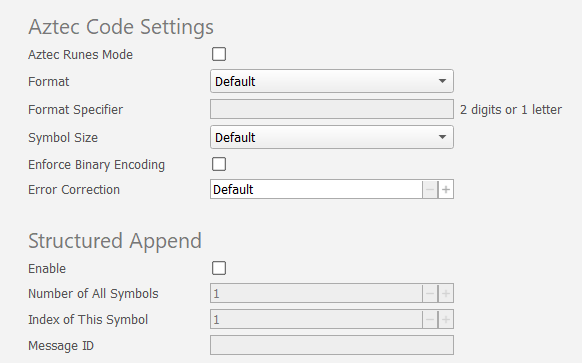
- Aztec Runes Mode
- Creates a compact Aztec Rune instead of a regular Aztec Code. An Aztec Rune can encode one integer from 0 to 255. Use this mode only when your application specifically requires Aztec Runes.
- Format
- Select the format required by the receiving application:
| Format | Description |
|---|---|
| Default | Creates a standard Aztec Code without a special data format. |
| GS1/UCC/EAN | Encodes GS1 Application Identifier data and places FNC1 in the first position. |
| Industry | Places FNC1 in the second position. Enter the required Format Specifier as two digits or one letter. |
- Symbol Size
- Leave Default selected to calculate a suitable size automatically. Select a fixed size from 15x15 to 151x151 modules only when your application requires specific symbol dimensions and make sure the data fits.
- Enforce Binary Encoding
- Uses binary encoding for all input characters. This is useful for binary data. For text, it can create a larger symbol because text compaction is not used.
- Error Correction
- Specifies the percentage of additional data used for error correction. The available range is 1 to 89%; Default uses approximately 23%. A higher value adds redundancy and can increase the symbol size.
- Structured Append
-
Splits a message across multiple Aztec Code symbols so that a compatible reader can reconstruct the complete message. Enable the option and set:
- Number of All Symbols: total number of symbols, from 1 to 26.
- Index of This Symbol: position of the current symbol, from 1 to 26.
- Message ID: the same identifier for every symbol in the sequence.
Codablock-F
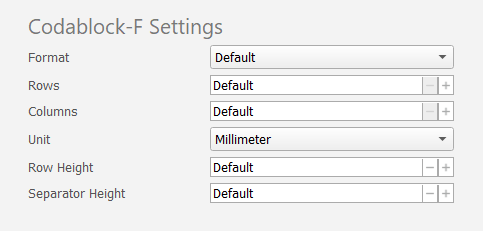
Codablock-F is a stacked symbology based on Code 128. It organizes the encoded data into multiple rows.
| Setting | Description |
|---|---|
| Format | Use Default for the standard format or GS1/UCC/EAN for GS1 Application Identifier data. |
| Rows | Number of rows, from 2 to 44. Leave Default selected to calculate the value automatically. |
| Columns | Number of data columns, from 4 to 62. Start, stop, and indicator columns are not included. Leave Default selected to calculate the value automatically. |
| Unit | Measurement used for Row Height and Separator Height. |
| Row Height | Height of each row in the selected unit. Leave Default selected for automatic sizing. |
| Separator Height | Height, or thickness, of the separator bars between rows in the selected unit. |
Keep the automatic values unless your application specifies fixed dimensions. After using fixed values, perform test scans with the final printing process and scanners.
Composite
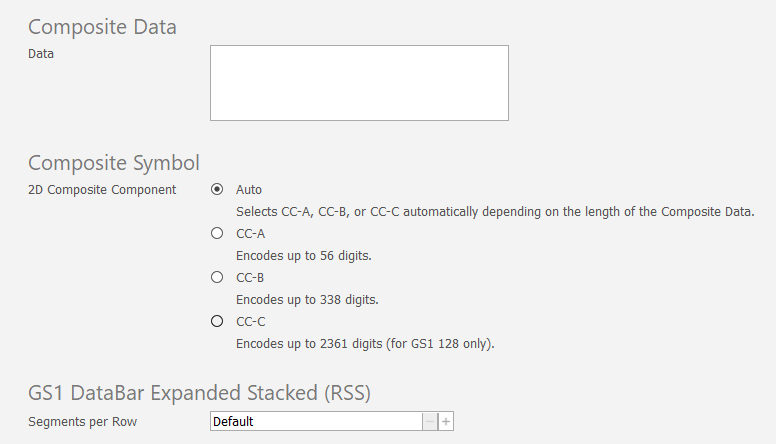
Composite symbols combine a linear component with a 2D composite component. The following linear components are supported:
- EAN-8, EAN-13, UPC-A, and UPC-E
- GS1-128
- GS1 DataBar, GS1 DataBar Stacked, GS1 DataBar Stacked Omnidirectional, GS1 DataBar Truncated, and GS1 DataBar Limited
- GS1 DataBar Expanded and GS1 DataBar Expanded Stacked
The 2D composite component uses Micro PDF417 for CC-A and CC-B, or PDF417 for CC-C.
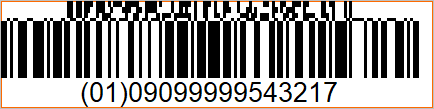
- Data
- Enter the content for the 2D composite component. Adding data activates this component.
- 2D Composite Component
- Select the component required by your application. Auto is recommended and selects CC-A, CC-B, or CC-C according to the data length.
- Segments per Row
- For GS1 DataBar Expanded Stacked, specifies the number of graphical segments in each row and therefore affects the symbol width. Leave Default selected to calculate the value automatically.
| Component | Capacity | Structure |
|---|---|---|
| Auto | Depends on the selected component | Selects CC-A, CC-B, or CC-C automatically according to the data length. |
| CC-A | Up to 56 digits | Micro PDF417 variant with 3 to 12 rows and 4 columns. |
| CC-B | Up to 338 digits | Micro PDF417 variant with 3 to 12 rows and 2 to 4 columns. Use it when the data does not fit in CC-A. |
| CC-C | Up to 2361 digits | PDF417 variant with 3 to 30 rows. Available only with a GS1-128 linear component. |
Data Matrix
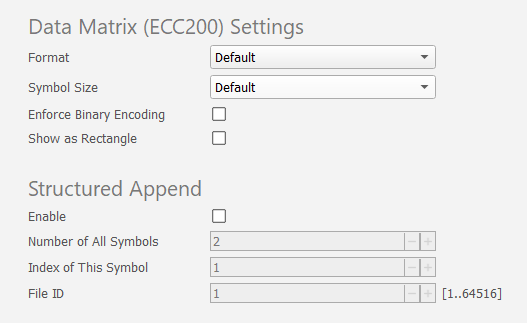
Data Matrix supports standard, GS1, industry, and application-specific data formats.
- Format
- Select the format required by the receiving application. For most applications, keep Default selected.
| Code Format | Description |
|---|---|
| Default | Creates a standard Data Matrix symbol without a special data format. |
| GS1/UCC/EAN | Encodes GS1 Application Identifier data and places FNC1 in the first position. |
| Industry | Places FNC1 in the second position for an industry-specific data format. |
| Format 05 | Adds the Macro 05 header and trailer automatically. |
| Format 06 | Adds the Macro 06 header and trailer automatically. |
| Reader Programming | Creates a symbol for programming compatible reading devices. |
| DP Postmatrix | Data Matrix-based format defined by Deutsche Post. |
- Symbol Size
- Leave Default selected to calculate the smallest supported square or rectangular size that fits the data. Fixed sizes include square symbols from 10x10 to 144x144 modules, traditional rectangular sizes, and extended DMRE sizes such as 8x144 and 12x88. Select a fixed size only when required and make sure the data fits.
- Enforce Binary Encoding
- Uses binary encoding for all input characters. This is useful for binary data. For text, it can create a larger symbol because text compaction is not used.
- Show as Rectangle
- Prefers rectangular symbol sizes when the size is calculated automatically.
- Structured Append
-
Splits a message across multiple Data Matrix symbols so that a compatible reader can reconstruct the data in the correct order. Enable the option and set:
- Number of All Symbols: total number of symbols, from 2 to 16.
- Index of This Symbol: position of the current symbol, from 1 to 16.
- File ID: value from 1 to 64516 that must be identical in all symbols of the sequence.
DotCode
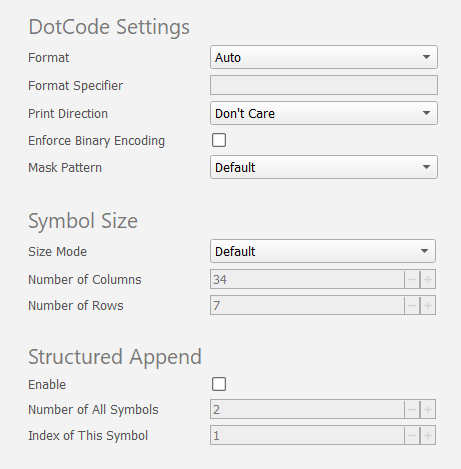
DotCode is designed for industrial direct-part marking.
- Format
- Select the format required by the receiving application. In most cases, keep Auto selected.
| Code Format | Description |
|---|---|
| Auto | Uses GS1 format when the data starts with two digits; otherwise uses Generic. |
| Generic | Forces the generic format. Barcode Studio may add a leading FNC1 when needed to distinguish the data from GS1 data. |
| GS1 | Encodes GS1 Application Identifier data. The data starts with a two-digit Application Identifier. |
| Industry | Places FNC1 in the second position. Enter the required Format Specifier as two digits or one letter. |
| Macro 05 / 06 / 12 | Adds the corresponding standard macro header and trailer automatically. |
| Custom Macro | Adds a custom macro envelope using the two-digit Format Specifier as its identifier. Add any required GS or RS control characters within the data yourself. |
| Reader Programming | Creates a symbol for programming compatible reading devices. |
- Print Direction
- Horizontal and Vertical use the direction in which the print head moves to optimize the arrangement of the dots. Keep Don't Care selected unless your printing process requires a specific direction. This setting is available only when neither the number of rows nor columns is fixed.
- Enforce Binary Encoding
- Uses binary encoding for all input characters. This is useful for binary data. For text, it can create a larger symbol because text compaction is not used.
- Mask Pattern
- Controls how the dots are distributed within the symbol:
| Mask Pattern | Description |
|---|---|
| Default | Evaluates all available masks automatically to select the pattern with the best readability score. This calculation can take longer. |
| No Prime Mask | Selects a mask automatically without using prime patterns. |
| Fast Calculation | Uses a faster automatic calculation, but the resulting pattern can be less favorable for reading. |
| Fixed Mask 0 to 3 | Uses the selected standard mask. Select a fixed mask only when required by your application. |
| Fixed Prime Mask 0' to 3' | Uses the selected prime pattern. The scanner must support DotCode Revision 4.0 or later. |
- Size Mode
- Controls how Barcode Studio determines the number of rows and columns:
| Size Mode | Size Field | Description |
|---|---|---|
| Default | No additional field | Calculates the size automatically using a default columns-to-rows ratio of 3:2. |
| Ratio Width/Height | Ratio Width/Height | Calculates the size automatically using the specified columns-to-rows ratio. |
| Fixed Width | Number of Columns | Uses the specified number of columns and calculates the required rows. |
| Fixed Height | Number of Rows | Uses the specified number of rows and calculates the required columns. |
| Fixed Width/Height | Number of Rows and Number of Columns | Uses both specified dimensions. Make sure the data fits. |
- Structured Append
-
Splits a message across multiple DotCode symbols so that a compatible reader can reconstruct the complete message. Enable the option and set:
- Number of All Symbols: total number of symbols, from 2 to 35.
- Index of This Symbol: position of the current symbol, from 1 to 35.
Han Xin Code
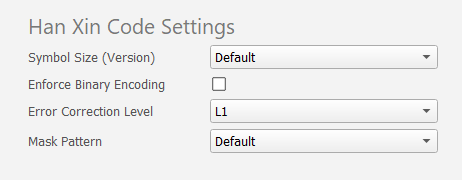
- Symbol Size (Version)
- Default selects the smallest supported symbol that can hold the data. Select one of the fixed sizes from 23 x 23 through 189 x 189 modules only when your application requires a specific symbol size.
- Enforce Binary Encoding
- Uses binary encoding for all input characters. This is useful for binary data. For text, it can create a larger symbol because text compaction is not used.
- Error Correction Level
- Higher levels can recover more damaged codewords, but leave less capacity for data. Select the level required by your application.
| Level | Approximate Recovery Capacity |
|---|---|
| L1 | Up to ~8% |
| L2 | Up to ~15% |
| L3 | Up to ~23% |
| L4 (highest) | Up to ~30% |
- Mask Pattern
- Distributes the modules to avoid large light or dark areas. Keep Default for automatic selection. Select a fixed mask from 0 to 3 only when required by your application.
MaxiCode
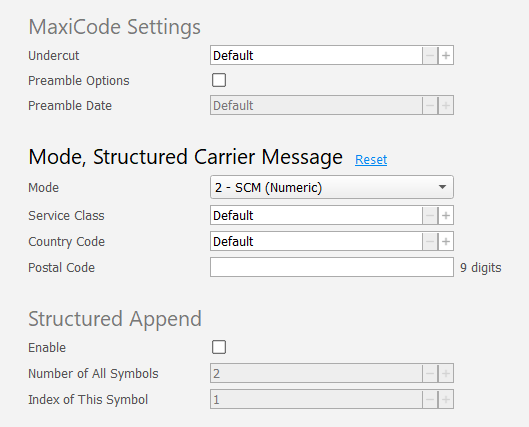
MaxiCode symbols have a circular bull's-eye center surrounded by hexagonal dots. The symbol was originally developed by UPS for package delivery workflows. Barcode Studio supports Standard and Enhanced Error Correction (SEC / EEC).
- Undercut
- Controls the diameter of the hexagonal elements as a percentage of their full size. Keep Default unless your printing process requires a different value. Verify the finished symbol after changing this setting.
- Preamble Options
- Adds the preamble used by Open System Standards. Enable it only when the receiving application requires it. When enabled, Preamble Date becomes available; keep its default value of 96 unless another value is specified.
- Mode
- Select the mode required by the receiving application:
| Mode | Description |
|---|---|
| 4 - Standard | Encodes general alphanumeric data with standard error correction. |
| 2 - SCM (Numeric) | Encodes a Structured Carrier Message with a numeric postal code of up to 9 digits. |
| 3 - SCM (Alphanumeric) | Encodes a Structured Carrier Message with an alphanumeric postal code of up to 6 characters. |
| 5 - Full EEC | Uses enhanced error correction and provides less capacity for data. |
- Structured Carrier Message
- Modes 2 and 3 use Service Class, Country Code, and Postal Code to identify the shipment. Enter the values required by the carrier application. For the corresponding escape-sequence syntax, open Help > Online Resources > Barcode Reference.
- Structured Append
- Splits a message across 2 to 8 MaxiCode symbols. Set Number of All Symbols to the total count and Index of This Symbol to the unique position from 1 to 8.
PDF417 / Micro PDF417
PDF417 and Micro PDF417 are stacked 2D code types with error correction. Barcode Studio can calculate the symbol dimensions automatically. Some settings are available only for one of the two code types.
Keep the automatic settings unless your application specifies fixed dimensions or another error correction level. If you use fixed values, verify the finished barcode at its intended size and output resolution.
PDF417 Settings
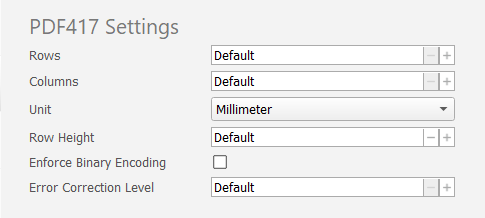
Unit, Row Height, and Enforce Binary Encoding are available for both PDF417 and Micro PDF417. Rows, Columns, and Error Correction Level are available for PDF417 only. Micro PDF417 provides a separate Columns setting under Micro PDF417 Settings.
| Setting | Range | Description |
|---|---|---|
| Rows | Default or 3 to 90 | Sets the number of rows. Default calculates the value automatically. Available for PDF417 only. |
| Columns | Default or 1 to 30 | Sets the number of data columns; start, stop, and indicator codewords are not included. Default calculates the value automatically. Available for PDF417 only. |
| Unit | Available measurement units | Selects the unit used for Row Height. |
| Row Height | Default or a value in the selected unit | Sets the height of each row. Default calculates the height automatically. |
| Enforce Binary Encoding | On or off | Uses binary encoding for all input characters. For text, this can produce a larger symbol. |
| Error Correction Level | Default or 0 to 8 | Level 0 detects errors without correcting them. Higher levels can recover more damage but reduce data capacity. Default selects a suitable level automatically. Available for PDF417 only. |
Micro PDF417 Settings
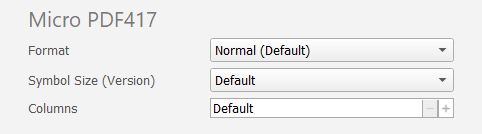
The following settings are available for Micro PDF417 and derived code types.
- Format
- Select a special format only when the receiving system requires it:
| Format | Purpose |
|---|---|
| Normal (Default) | Selects text, numeric, or binary compaction automatically to create a compact symbol. |
| GS1/UCC/EAN-128 Emulation | Use when the receiving system must handle the symbol as GS1-128 data. |
| Code 128 Emulation | Use when the receiving system must handle the symbol as Code 128 data. |
| Code 128 FNC1 2nd Position | Uses Code 128 emulation with FNC1 in the second position. |
| Linked GS1/UCC/EAN-128 | Links the Micro PDF417 component to a linear GS1-128 symbol. |
| 05 Macro / 06 Macro | Adds the corresponding standard macro header and trailer automatically. |
| CC-A Data Mode / CC-B Prefix | Special formats for use as a composite component. |
Not all scanner hardware supports every Micro PDF417 format. Verify compatibility with your scanner before deploying.
- Symbol Size (Version)
- Default selects a supported symbol size automatically. Fixed choices are shown as columns x rows and range across supported combinations from 1 x 11 through 4 x 44. Not every intermediate combination is available.
- Columns
- Sets 1 to 4 columns while Symbol Size (Version) is Default. If you select a fixed symbol size, its column count is used instead.
Structured Append / Macro PDF417
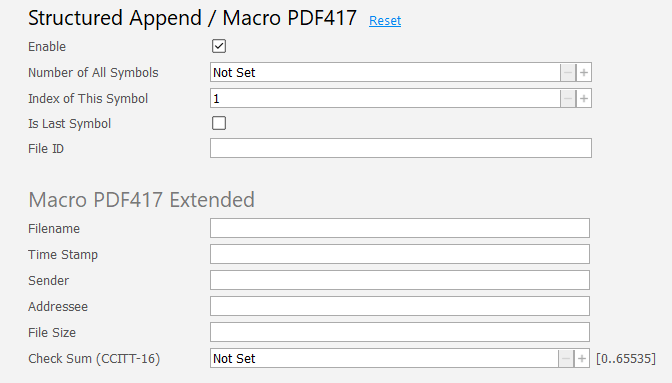
Macro PDF417 splits one logical message across multiple PDF417 symbols. Enable the feature and use the same File ID for every symbol in the sequence.
| Field | Description |
|---|---|
| Enable | Activates Structured Append / Macro PDF417. |
| Number of All Symbols | Sets the total number of symbols from 1 to 99999, or Not Set when the total is not supplied. |
| Index of This Symbol | Sets the position of the current symbol from 1 to 99999. |
| Is Last Symbol | Marks the current symbol as the final symbol in the sequence. |
| File ID | Identifies the sequence and must be identical in all of its symbols. |
- Macro PDF417 Extended
- These optional fields add file information to the sequence:
| Field | Description |
|---|---|
| Filename | Name of the represented file. |
| Time Stamp | Time in seconds since 1970-01-01 00:00:00 UTC. |
| Sender | Identifies the sender. |
| Addressee | Identifies the intended recipient. |
| File Size | Supplies the file-size value for the sequence. |
| Check Sum (CCITT-16) | Supplies an optional checksum value from 0 to 65535. |
QR-Code / QR-Code (JIS) / Micro QR-Code / Swiss QR-Code
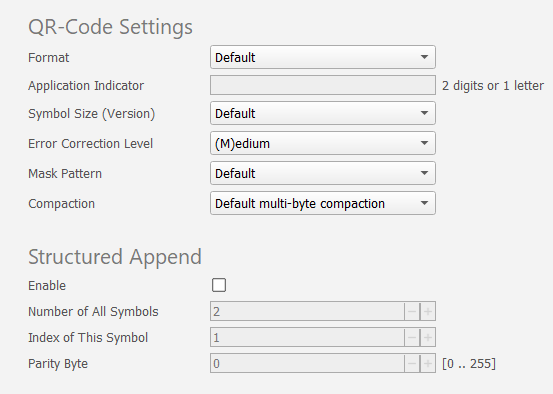
- Format
- Select Default for general data, GS1/UCC/EAN for GS1 Application Identifier data, or Industry when an application standard requires an industry format. Available formats depend on the selected QR-Code variant.
- Application Indicator
- For the Industry format, enter the required two digits or one letter.
- Symbol Size (Version)
- Default selects a suitable size automatically. QR-Code provides versions 1 (21 x 21 modules) through 40 (177 x 177 modules). Micro QR-Code provides M1 (11 x 11 modules) through M4 (17 x 17 modules).
- Error Correction Level
- Higher levels can recover more damaged codewords, but leave less capacity for data:
| Level | Approximate Recovery Capacity |
|---|---|
| (L)ow | Up to ~7% |
| (M)edium (default) | Up to ~15% |
| Q (Quartile) | Up to ~25% |
| (H)igh | Up to ~30% |
Not all versions (sizes) of Micro QR-Code support every error correction level. Barcode Studio automatically selects the highest feasible level for the chosen version.
- Mask Pattern
- Distributes the modules to avoid large light or dark areas. Keep Default for automatic selection. QR-Code provides fixed masks 0 to 7; Micro QR-Code provides fixed masks 0 to 3. Select a fixed mask only when required by your application.
- Compaction
- Controls multibyte compaction for text encodings such as Kanji and Chinese:
| Mode | Description |
|---|---|
| Default multi-byte compaction | Selects a suitable compaction method automatically. |
| No multi-byte compaction | Encodes the input without multibyte compaction. |
| Kanji character compaction | Uses the compact representation for Kanji characters. |
| Chinese character compaction | Uses the compact representation for Chinese characters. |
For binary data, select No multi-byte compaction so that byte values are not interpreted as multibyte text.
- Structured Append
- Splits a message across 2 to 16 QR-Code symbols. Set Number of All Symbols to the total count, Index of This Symbol to the unique position from 1 to 16, and Parity Byte to a value from 0 to 255. Use the same parity byte for every symbol in the sequence. Structured Append is not available for Micro QR-Code.
Data Assistant
The Data Assistant provides suitable input fields for supported application formats, including vCard contact data, vCalendar events, GS1 Application Identifiers, and mobile tagging. The available application types depend on the selected code type.
- Application Type
- Selects the application format and displays its input fields.
- Data Selection
- For composite codes, selects whether the generated content is assigned to Symbol Data or Composite Data. It has no effect on other code types.
- Raw Data
- Shows the code-ready content generated from your entries. It updates when you change the application fields or the GS1 list.
Form-Based Applications
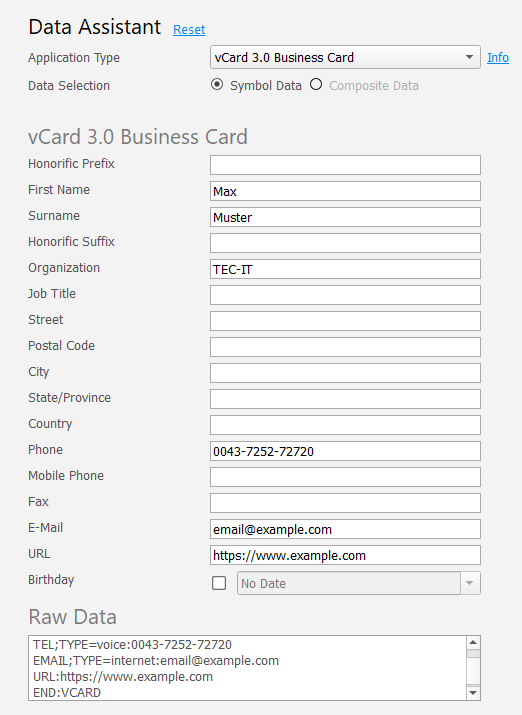
For application types such as vCard 3.0 Business Card or vCalendar Event, enter contact or event information in the labeled fields. Barcode Studio assembles the corresponding data format and displays the result under Raw Data.
GS1 Application Identifiers
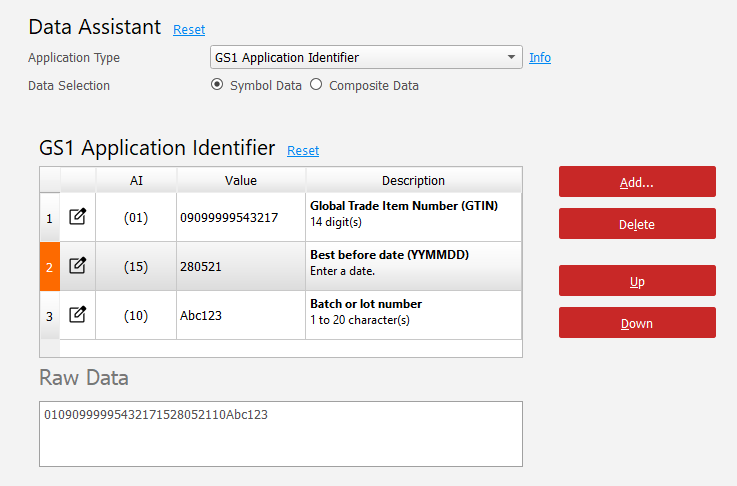
Select GS1 Application Identifier to build the data from individual AIs. The list shows each AI, its value, and its description. Use Add... to select an AI, enter or edit its value in the list, and arrange the entries in the required order with Up and Down. Use Delete to remove an entry. Raw Data shows the GS1 data assembled from the list.