Data List
Overview
The Data List enables you to create and manage multiple data records for exporting a series of code images or printing labels. First, configure the barcode on the Codes tab (see Barcode Studio User Interface). Then add the records on the Data List tab.
Add records by:
Data List View
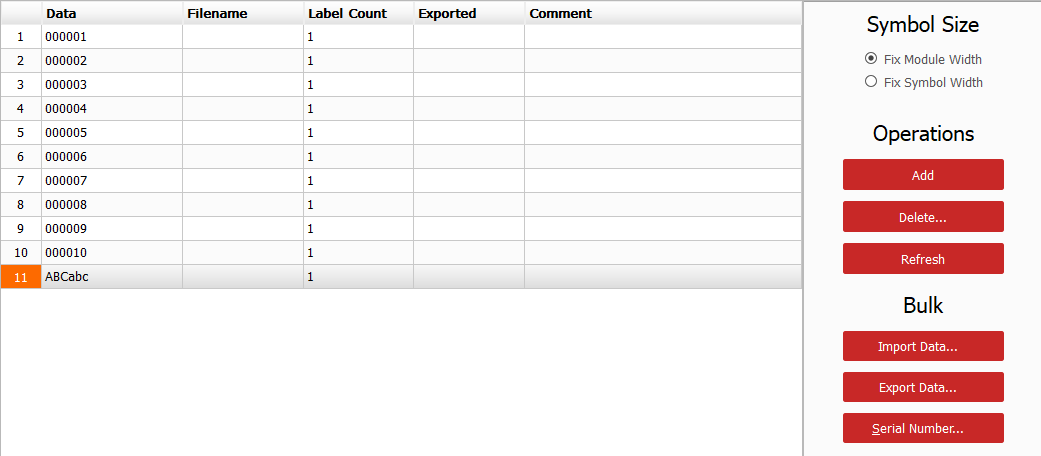
The data list contains the records used to create barcode images or labels. Select a row to show its barcode in the Code View above the list.
Records with errors are shown in red. Select an affected row to view its error message in the Code View. To check all records and open the complete error list, click the N Issue(s) link in the status information. The status bar at the bottom of the window shows the total number of data rows and the number of rows with issues. Correct affected records before exporting codes or printing labels.
Use Operations to add, delete, or refresh records. Use Bulk to import records, export the list as a CSV file with Export Data..., or generate serial numbers. Edit individual values directly in the table. To create barcode image files, select Export > Export Codes....
Data List Columns
| Column | Editable | Description |
|---|---|---|
| (row number) | No | Row number and navigation aid. Click the column header to reset the original order. |
| Data | Yes | Data encoded in the barcode (required). Enter it manually, import it from a file, or generate it as a serial number. |
| Composite Data | Yes | Data encoded in the 2D component of a composite barcode. Visible only for supported composite codes. |
| Caption Above, Caption Above 2, Caption Below, Caption Below 2 | Yes | Optional text displayed above or below the barcode. The columns appear only when the corresponding captions are enabled in Settings Pages. |
| Filename | Yes | Name of the exported image file. Barcode Studio can generate it during export, or you can enter or import it in advance. |
| Label Count | Yes | Number of label copies to print for the record. Does not affect image export. |
| Exported | No | Read-only timestamp of the last image export. |
| Comment | Yes | Optional comment for the record. Does not affect the encoded data. |
Module Width / Symbol Size
Choose which dimension remains constant across all records:
- Fixed Module Width (default): Keeps the module width from the current code settings. The overall symbol dimensions may vary with the encoded data.
- Fixed Symbol Width: Keeps the overall symbol width constant. The module width and resulting code quality may vary between records.
Sort Order
Click a column header to sort the list:
- First click: ascending
- Second click: descending
- Third click: original order
Click the row-number column to restore the original order. The current sort order is also used for label printing. See Labels.
Editing
Add: Click Add to insert a new row. Columns are pre-filled from the current Codes page settings.
Edit: Double-click a cell or press F2 to edit Data, Composite Data, captions, Filename, Label Count, or Comment. Data is required; all other columns are optional.
Delete: Select one or more rows and click Delete.... Confirm the dialog to proceed.
Refresh: Click Refresh to check all records again and update their error status.
Populate Column: Enter a value in a cell, press Enter, right-click the cell, and select Populate Column to copy the value to every row in that column.
File Import
Import records from a delimited text file, such as CSV or TSV.
To import data:
- In the Data List, select Bulk > Import Data....
- Select the import file, adjust its format settings, and check the preview.
- Select Next >.
- Choose an application type if required, assign the source columns, and select Import.
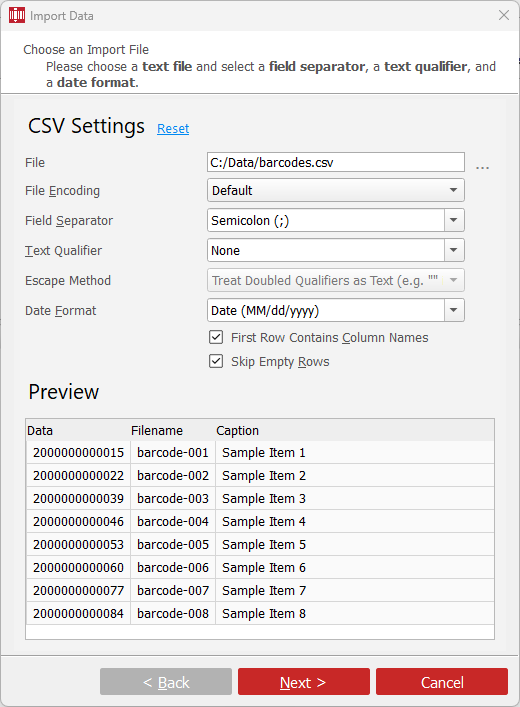
Import Settings
| Field | Description |
|---|---|
| File | Select the file to import. Each data row becomes one record, and the field separator divides the row into columns. |
| File Encoding | Select Default to use ANSI on Windows and UTF-8 on macOS and Linux. You can also explicitly select ANSI, UTF-8, or UTF-16. |
| Field Separator | Select comma, semicolon, or tab, or enter another character that separates the columns. |
| Text Qualifier | Select a character such as ' or " when a field can contain the field separator. Text between matching qualifiers is treated as one field. |
| Escape Method | Specify whether a text qualifier within a qualified field is doubled ("") or preceded by a backslash (\"). This setting is available only when a text qualifier is selected. |
| Date Format | Select the format used for date values in the file. One date format can be used per file. |
| First Row Contains Column Names | Use the first row as source column names for data mapping instead of importing it as a record. |
| Skip Empty Rows | Ignore blank rows in the import file. |
| Preview | Review the first rows of the file using the selected import settings. |
Data Mapping
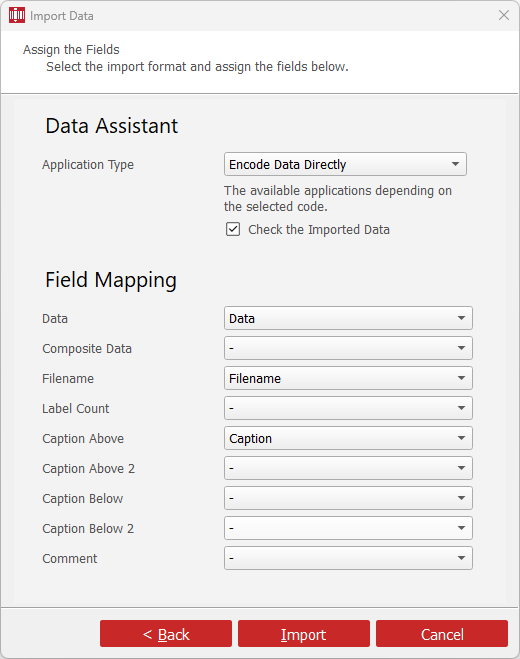
For a direct import, leave Application Type set to Encode Data Directly. For structured data such as vCard or GS1 data, select the corresponding application type and assign the individual source columns. Barcode Studio then assembles the formatted application data. The available application types depend on the selected code. For more information, see Data Assistant.
Assign source columns to Data, Composite Data, Filename, Label Count, Caption Above, Caption Above 2, Caption Below, Caption Below 2, or Comment. A source column must be assigned to Data; all other assignments are optional.
Keep Check the Imported Data enabled to verify that imported values match the selected application format. Disable it only if validation causes performance problems with very large files.
Serial Numbers
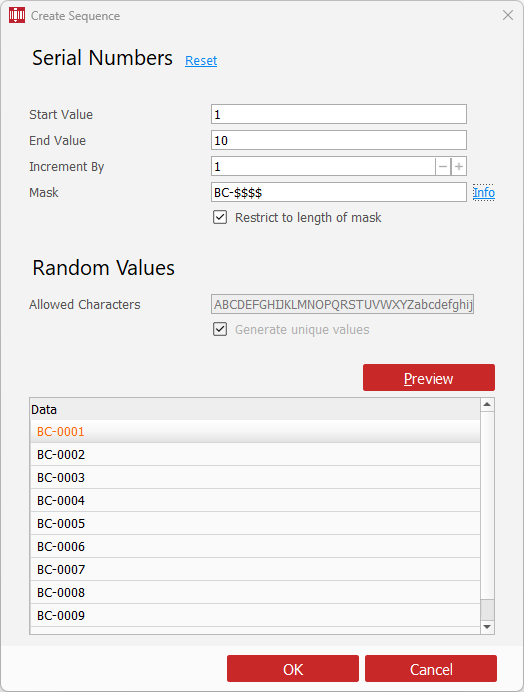
The Serial Numbers Generator populates the Data column with formatted serial numbers.
Range
- Start Value
- Sets the first numeric value in the sequence.
- End Value
- Sets the upper limit. The last generated value never exceeds it.
- Increment By
- Sets the difference between consecutive numeric values.
Mask
The Mask defines the output pattern using placeholder characters:
| Character | Behavior |
|---|---|
# |
Inserts digits from the numeric value and fills unused positions with leading spaces. |
$ |
Inserts digits from the numeric value and fills unused positions with leading zeros. |
* |
Inserts digits from the numeric value and fills unused positions with leading asterisks. |
? |
Inserts a random character from Allowed Characters. |
| Other characters | Copies the character unchanged into every generated value. |
Examples:
| Mask | Sample output | Description |
|---|---|---|
$$ |
01, 02, ..., 10, 11 |
Leading zeros |
## |
1, 2, ..., 10, 11 |
Leading spaces |
** |
*1, *2, ..., 10, 11 |
Leading asterisks |
00$$ |
0001, 0002, ... |
00 as a constant prefix |
A$$ |
A01, A02, ... |
A as a constant prefix |
Select Info beside Mask to display a brief description of the mask characters.
Options
- Restrict to length of mask
- Limits generated values to the mask length. If a numeric value contains more digits than the numeric placeholders, its leading digits are removed. Clear this option to retain the complete numeric value.
With Restrict to length of mask enabled, a mask of $$$ formats the value
1000 as 000. Use enough numeric placeholders to prevent required digits
from being removed.
- Random Values
- Becomes available when the mask contains at least one
?. - Allowed Characters
- Specifies the characters that can replace each
?in the mask.
- Generate unique values
- Checks the generated sequence for duplicate final values. If a duplicate occurs, Barcode Studio stops and displays an error. Generate the sequence again or adjust the mask, range, or allowed characters.
- Preview
- Generates a preview without changing the Data List. Select OK to append the sequence to the list.
Export Codes
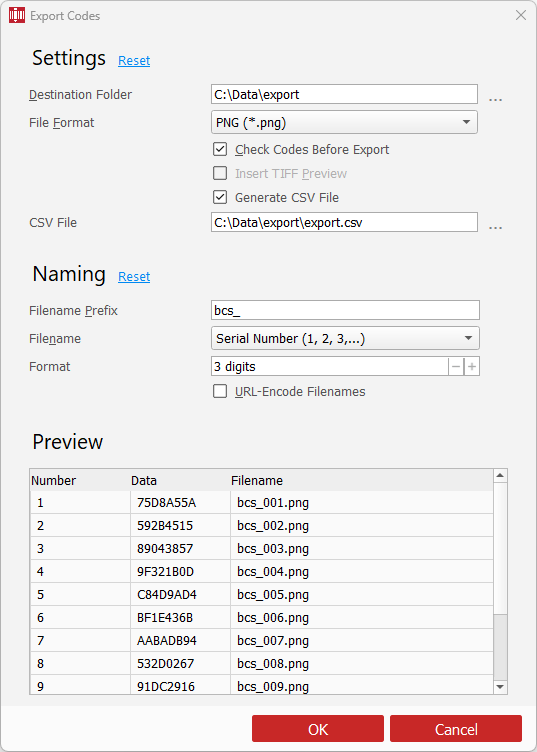
In the Data List view, select Export > Export Codes... in the Code View, or select Export directly. Choose the destination folder and file format, configure the filenames, check the preview, and select OK. Barcode Studio creates one image file for each record in the Data List.
Settings
| Field | Description |
|---|---|
| Destination Folder | Folder in which the exported image files are saved. |
| File Format | Image format used for all exported codes. See Appendix C: Image Types. |
| Check Codes Before Export | Checks all Data List records before creating files. If a record is invalid, the export does not start and Barcode Studio opens an error list. |
| Insert TIFF Preview | Adds a TIFF preview to EPS files for applications that cannot display EPS content directly. Available only for EPS formats. |
| Generate CSV File | Creates a CSV file after the image files have been exported successfully. See Export Data. |
| CSV File | Shows the selected CSV output file. Use the button beside the field to open the Export Data settings. |
Naming
| Field | Description |
|---|---|
| Filename Prefix | Text added before every generated filename. It is not added to an existing value from the Filename column. |
| Filename | Determines how missing filenames are generated. See the methods below. |
| Format | Sets the minimum number of digits for serial-number filenames. Shorter numbers are padded with leading zeros; No Format uses numbers without padding. Available only for serial-number methods. |
| URL-Encode Filenames | Replaces affected filename characters with percent-encoded values. |
Filename generation methods:
| Method | Description |
|---|---|
| Same as Data | Generates the filename from the barcode data. For example, data 12345 produces bcs_12345.png when bcs_ is the prefix and PNG is selected. |
| Serial Number | Generates sequential filenames starting with 1. The Format setting can add leading zeros, for example bcs_001.png. |
| Same as Data, but Prefer Existing | Uses the value in the Data List Filename column when present. If the value is empty, the filename is generated from the barcode data. |
| Serial Number, but Prefer Existing | Uses the value in the Data List Filename column when present. If the value is empty, a serial-number filename is generated. |
Prefer Existing refers to values in the Data List Filename column, not to files that already exist in the destination folder.
If a generated or imported filename contains characters that cannot be used in filenames, or if the filename is intended for use in a URL, enable URL-Encode Filenames. The following table shows the affected characters:
| Char | Encoded | Char | Encoded | Char | Encoded |
|---|---|---|---|---|---|
\ |
%5C |
/ |
%2F |
: |
%3A |
* |
%2A |
? |
%3F |
" |
%22 |
< |
%3C |
> |
%3E |
\| |
%7C |
% |
%25 |
Preview shows the row number, barcode data, and resulting filename before the files are written.
Errors
If an issue occurs, Barcode Studio opens an error list that identifies the affected records. Common causes include:
- Data that cannot be encoded with the selected symbology (for example, letters in a digits-only code type).
- Invalid filenames because the generated name contains unsupported characters and URL encoding is not enabled.
Exporting many Data List records can require considerable time and disk space.
Export Data
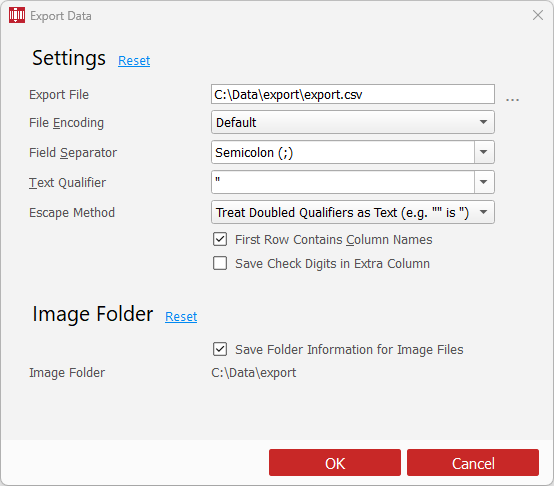
Use Export Data to save the Data List records to a CSV file. Select Bulk > Export Data... in the Data List. Alternatively, select Export > Export Data... in the Code View, or enable Generate CSV File in the Export Codes dialog and use the button beside CSV File.
| Field | Description |
|---|---|
| Export File | CSV file to create. |
| File Encoding | Character encoding of the CSV file. Default uses ANSI on Windows and UTF-8 on macOS and Linux; ANSI, UTF-8, and UTF-16 can also be selected explicitly. |
| Field Separator | Character that separates fields into columns, such as a comma, semicolon, or tab. You can also enter another character. |
| Text Qualifier | Optional character that encloses a complete field, for example when the field contains the selected separator. |
| Escape Method | Determines how occurrences of the text qualifier inside a field are written. Available only when a text qualifier is selected. |
| First Row Contains Column Names | Writes the Data List column names to the first row of the CSV file. |
| Save Check Digits in Extra Column | Adds the calculated check digits as an additional CSV column. |
| Save Folder Information for Image Files | Writes complete image paths instead of relative filenames to the CSV Filename column. |
| Image Folder | Base folder added to relative image filenames. When opened from Export Codes, the destination folder is used and cannot be changed here; when opened directly, you can select the folder. |
Select OK to write the CSV file.